
Product Features
The functions of the eEGG vary depending on the model. Below is a list of supported functions for each model:
| Model | Product Name | Video Player | Image Player | Music Player | iRadio | Games | Voice Control | AI Dialogue | Mobile File Transfer |
|---|---|---|---|---|---|---|---|---|---|
| eEGG5 | 5cm eEGG | ✔️ | ✔️ | ❌ | ❌ | ✔️ | ❌ | ❌ | ❌ |
| eEGG6 | 6cm eEGG | ✔️ | ✔️ | ✔️ | ✔️ | ✔️ | ❌ | ✔️ | ✔️ |
| eEGG7 | 7cm eEGG | ✔️ | ✔️ | ✔️ | ✔️ | ✔️ | ❌ | ✔️ | ✔️ |
| eEGG7-AI | 7cm AI eEGG | ✔️ | ✔️ | ✔️ | ✔️ | ❌ | ✔️ | ✔️ | ✔️ |
Operation Guide
Power On
There is a silicone power button on the top of the eEGG. Press this button firmly to power on the device.
Shake-and-Do Operation
The eEGG has a built-in G-sensor and can be used to achieve different functions by swinging it. Gently shake the eEGG several times, then stop and wait for about 1 second. The device will recognize the number of shakes and execute the corresponding function:
| Operation | Function | Description |
|---|---|---|
| Shake 1 time | Next/+ | Switch to the next menu item; Play the next media file; Increase the volume. |
| Shake 2 times | Run/Prev./- | Execute the selected menu or function; Play the previous file; Decrease the volume. |
| Shake 3 times | Open Menu | Display the menu. |
| Shake 4 times | Mode/Volume | Shaking 4 times opens a pop-up menu for adjusting volume/playback mode; |
| Shake 5 times | Power Off | After powering off, press the button on the eEGG to power it on. |
Charging
This device can be charged using various chargers with a Type-C interface. Under normal circumstances, the internal battery can be fully charged within 90 minutes.
If the device has been left unused for an extended period, causing over-discharge of the internal battery, please plug in the charger for 10 minutes before trying to turn the device on.
If the device is not used for a long time, it is recommended to fully charge it at least once every two months.
Menu
Function Menu

Video Playback

Image Playback

Music Playback

Mini-Games*

WIFI Menu

WIFI Configuration

Browser File Management

Mobile File Transfer

Local Music

Internet Radio

Dice*

Snake*

Maze*

Rock Paper Scissors*
Pop-up Menu
Playback Modes:
 Playlist Loop
 Single Loop
 Shuffle
 Play Lock
Volume:
 Mute
Mute
 Volume 1
 Volume 2
 Volume 3
 Volume 4
 Volume 5
 Volume 6
 Volume 7
Battery Level:
 Charging
 Low Battery
WiFi Configuration
Start "WiFi config" on eEGG:
- For eEGG5, flick the device 3 times to display the menu, then flick once to switch to the next menu item, until you switch to the WiFi menu, then flick twice.
- For eEGG6, eEGG7, and eEGG7-AI, flick the device 3 times to display the menu, then flick it once to switch to the next menu item, until you switch to the WiFi menu, then flick it twice.
Connect your phone to a 2.4G WiFi network.
Run the ESP-Touch app on your phone, and input your WiFi password, leave the AES Password field blank (do not enter anything).
Click "Confirm" button and wait for ESP-TOUCH to indicate successful configuration.
⚠️ Note 2: If network configuration fails on the first try, please try more several times.
Alternative Method: Edit config.ini File
Connect the eEGG device to your computer via USB cable.
Find the config.ini file in the ".set" directory of your eEGG device.
Note: The .set folder is hidden. Enable "Show hidden files" in your file explorer.
Open the config.ini file with a text editor and modify the wifi_SSID and wifi_password entries:
[SETTINGS]
default_feature = 0        ; Default power-on function
turnoff_confirm = 0        ; Power-off confirmation
shutdown_time = 60         ; Auto power-off time (minutes)
sensitivity = 4            ; Shake sensitivity (1-5)
bat_percent = 0            ; Show battery percentage
usbmsc_encrypt = 0         ; USB MSC encryption
wifi_ssid = yourWiFiSSID   ; Your WiFi SSID
wifi_password = 12345678   ; Your WiFi password
[END]
Manager the Files in eEGG by the Webserver build-in Device
Launch Webserver of eEGG
- For eEGG5Shake 3 times to display the menu, then shake once to switch menu item until the WiFi menu, then shake twice to enter the WiFi config. Shake once again to enter Webserver
- For eEGG6、eEGG7 and eEGG7-AIShake 3 times to display the menu, then shake once to switch menu item until the WiFi menu. Then shake twice to enter the WiFi menu.
Shake it again to select the item with the small computer icon (
 ), then shake twice to enter Webserver.
Open your computer's browser (make sure your computer's Wi-Fi network is on the same network as the device), and enter the device's IP address (usually 192.168.x.x).
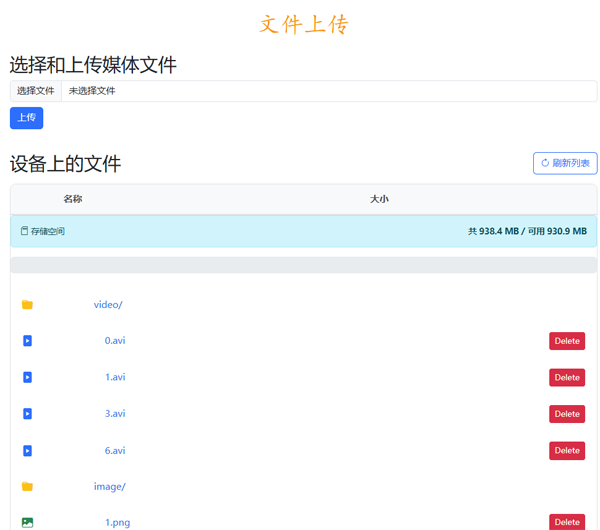
Follow the prompts to manage files on the device (upload files to or delete files from the device).
Transferring Files via Mobile Phone
Download and install the "eEGG File Conversion and Transfer Assistant" APP to your mobile phone.
Enter mobile file transfer mode on the eEGG device.
Connect your phone to the same WiFi network (SSID) as your eEGG device.
Open the mobile app and select the eEGG model in the settings menu.
Scan the QR code on the eEGG with the mobile app to connect.
Select video, image, and music files from your phone and transfer them to the eEGG.
- eEGG File Converter and Transfer Assistant will automatically convert image and video formats before transferring files
- Only supports landscape format videos no longer than 60 seconds
- Limit video resolution to 1920x1080 and frame rate to 30fps
- Test network connection before transferring files
Transfer Files via USB
Connecting the device directly to the computer via USB allows for easy copying of media files to the device's memory.
- Before copying video and image files, you need to use conversion tools
- Do not delete directories on the device
- .set directory - essential UI and configuration files
- .voice directory - voice response files (eEGG7 only)
- game directory - game files (not in eEGG7-AI)
- video/mjpeg directory - user video files
- image directory - user image files
- audio directory - user music files
eEGG Video & Image Converter Tools
Unzip the downloaded ZIP to any disk. Avoid Chinese characters in the path.
Video Converter
Launch the video converter.
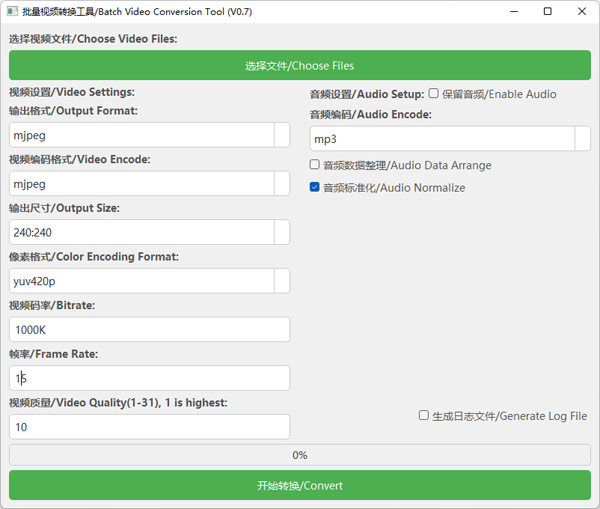
Choose settings:
- eEGG5 - Use preset for eEGG5 as below
- eEGG6 / eEGG7 - Use preset for eEGG6/eEGG7 as below
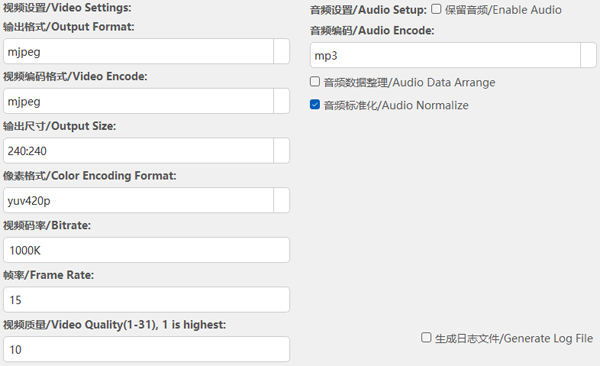
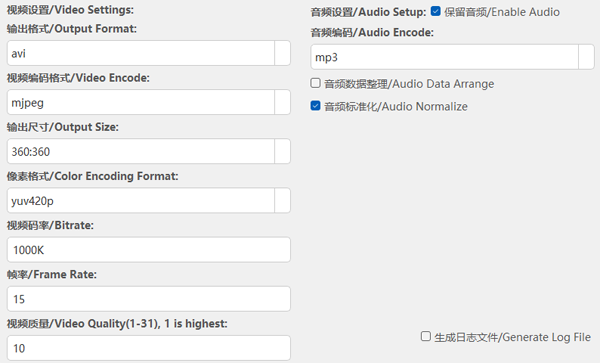
Add files (multi-select supported).
Press 「Convert」. Output files will appear in an output folder next to the source.
Image Converter
Launch the image converter.
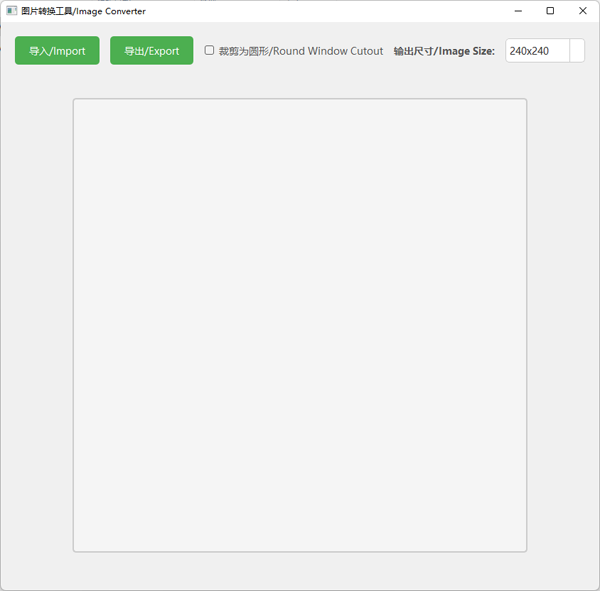
Set display parameters:
- eEGG5 - select 240×240
- eEGG6 / eEGG7 - select 360×360
Click「Import」to load source images.
Click「Export」and enter a file name and save.